|
The goal of this article is to illuminate the ways technology can make debate easier and more efficient. The tips range from basic (but absolutely essential) like using Verbatim, to advanced and creative tips like our suggestions vis-à-vis spell check. If you’re new to debate, haven’t put a lot of time into thinking about tech and debate, or feel overwhelmed, I suggest you check out just tips (1) on Verbatim, and (10) on timers. Everything else ranges from intermediate to advanced, and you can come back to check it out when you’re more comfortable. Below the fold are all 10 tech tips to improve your debating. 1. Use Verbatim Verbatim is a free, open-source platform for paperless debate built as a template for Microsoft Word (it does require having a full version of MS Word). You can download it here. You can find a manual and FAQ here. I cannot stress enough how important Verbatim is for debate. It makes evidence production and file organization a breeze. When you install Verbatim a template shortcut will appear on your desktop. When you open MS Word through that template, rather than opening Word directly, you’ll be opening a document that has all your settings already configured for debate. For example, when you write an essay for school, you probably want Word to open with TNR (Times New Roman), size 12, double-spaced. That doesn’t make sense for debate though, so Verbatim won’t open like that (though you can configure both your regular template and Verbatim to have your preferred, customized settings). Verbatim also adds a “Debate” panel to the ribbon. There are a whole bunch of useful tools in the Debate ribbon: a built-in timer, built-in OCR (more on this later), etc.  (Pictured: MS Word’s ribbon with the “Debate” tab added by Verbatim) The real usefulness of Verbatim, however, is in the macros: keyboard shortcuts that are extremely useful for evidence production and file organization. By simply clicking “F7” you can apply “tag” formatting to a piece of evidence. That’s useful for two reasons: first, it makes the tag bold and a little larger (the exact settings are customizable), making it easier for the eyes to quickly find and process the tag (and therefore easier to read in round without losing your place). Second, and more important, the formatting makes the tag appear at the appropriate level in the document map / navigation pane (see the below image). 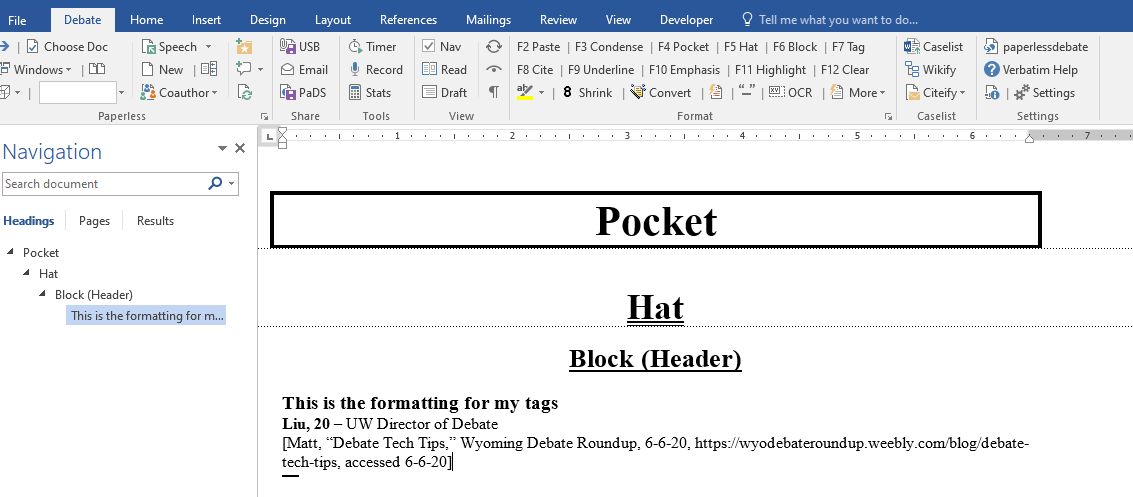 The doc map is essential for navigating large files, and Verbatim allows easy macros to keep it and your file organized. F4, F5, and F6 correlate to “pocket,” “hat,” and “block” which create layers of organization in your file (the language of pocket and hat are analogies to how we organized files in a pre-paperless world). You can have a series of specific uniqueness blocks (“AT: Trump Thumper”) under a general uniqueness “hat” that keeps all your blocks organized. See this screenshot of a disad file UW cut for last year’s college topic: 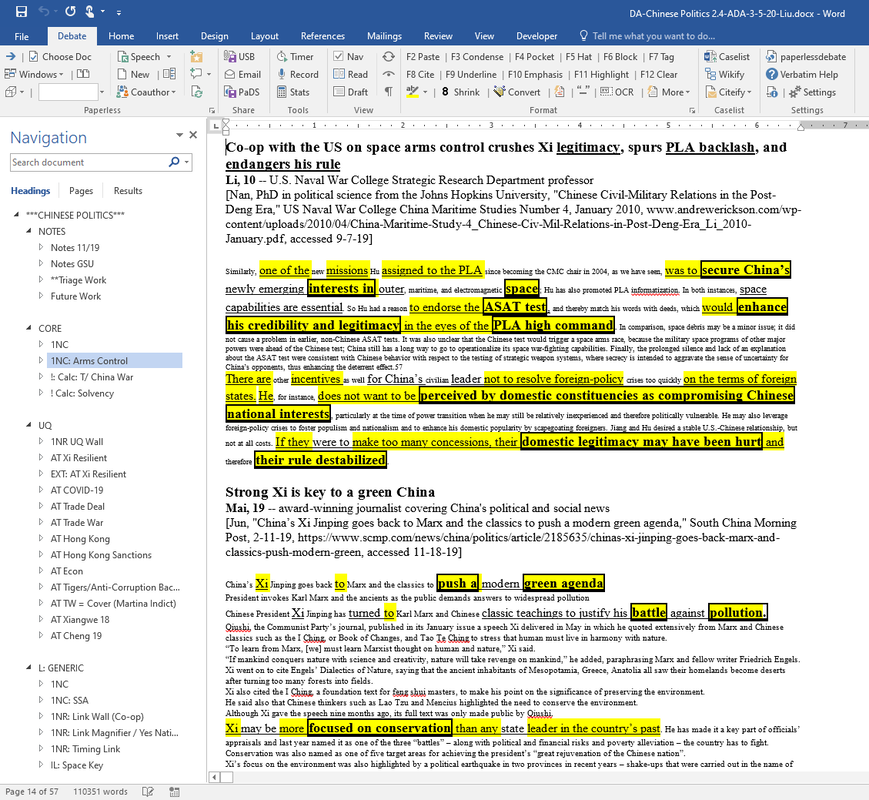 You can see in this screenshot how the layered headers help keep the file organized (and click to the section of the file you want to go to instantly). Verbatim makes it easy to just click F4, F5, F6 to create those headers. F7 creates a tag, F8 formats the part of the citation that is read aloud, F9 underlines text, F10 creates an emphasis marker (formatting that serves as a reminder to emphasize that part of the evidence while you’re reading it), F11 highlights text, and F12 clears all formatting. All extremely useful shortcuts! There’s also formatting shortcut to condense text (eliminate unnecessary or all line breaks, depending on your preference) and shrink un-underlined text. Your exact Verbatim settings (font, size, what macros do, and a whole bunch more) can be adjusted by clicking the settings button in the “Debate” tab on the ribbon. 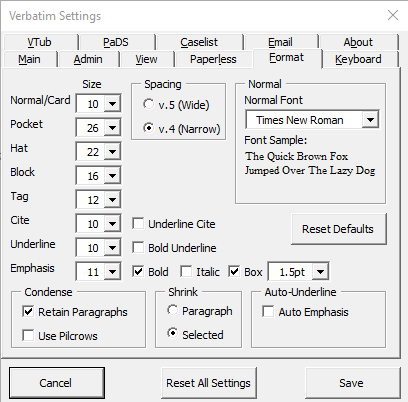 Note that most modern computers have the F keys set as alternate functions. For using Verbatim, you’re going to want to set the F keys as the dominate function (which makes adjusting brightness, volume, etc the alternate function). That might mean adjusting your keyboard settings in BIOS, or might be as simple as turning function lock on on your keyboard. You’ll need to google the exact adjustment required for your model of computer. 2. Acquire a good OCR program OCR (optical character recognition) turns an image of text into text you can edit in a program like MS Word. It is extremely useful for scanning texts from digital books or locked PDFs. My OCR (combined with my mouse functions, see below) is so efficient I use it for PDFs even if they already have editable text. I use ABBYY Finereader and consider it the gold standard of OCR. It works on small text, has an incredibly low error rate, captures line breaks accurately (which avoids annoying line break proliferation when copying from PDFs), and allows you to adjust the area you are screen-shotting for OCR purposes. If you’re unable to obtain a copy of ABBYY Finereader, there are free OCR programs online, and Verbatim has a built-in OCR tool that is functional. Having a good OCR tool is useful when it comes to formatting evidence and choosing the optimal Verbatim settings. I like to format my evidence to retain paragraphs (meaning there are line breaks in the evidence where a new paragraph begins, as opposed to collapsing all of the evidence into one giant paragraph). Retaining paragraphs is useful because it makes quick adjustment of evidence easy. Want to use a shorter version of a piece of evidence? If you haven’t retained paragraph integrity, you’re going to have to open the article, find the book, etc, to figure out where the paragraph breaks are so you can ethically adjust the evidence by ditching a few paragraphs. If you retain paragraph integrity, those adjustments are easy and quick. Why does a good OCR program matter for this? Because if you cut a lot of evidence from PDFs (as you should), when you copy and paste instead of OCR you’re going to get a line break after every sentence. The condense macro in Verbatim can eliminate these line breaks, but it’s going to eliminate every line break – destroying paragraph integrity. If you have a good enough OCR program to scan from PDFs you can adjust your Verbatim settings to “retain paragraphs” while using the condense function. 3. Multiply your productivity with a (cheap) gamer mouse First, I hope no one is using the trackpad. Please, please use a mouse. Trackpads are awful. Second, invest in a cheap gamer mouse. The UtechSmart Venus Gaming Mouse is $34.99 on Amazon. You can set-up the 12 side buttons as macros that make cutting cards and organizing files even more efficient. I was a gamer mouse holdout for years. I experimented with an expensive Razer mouse, didn’t love it, and went back to my $5 two-button Logitech. I was so, so wrong. The side buttons are so worth it. 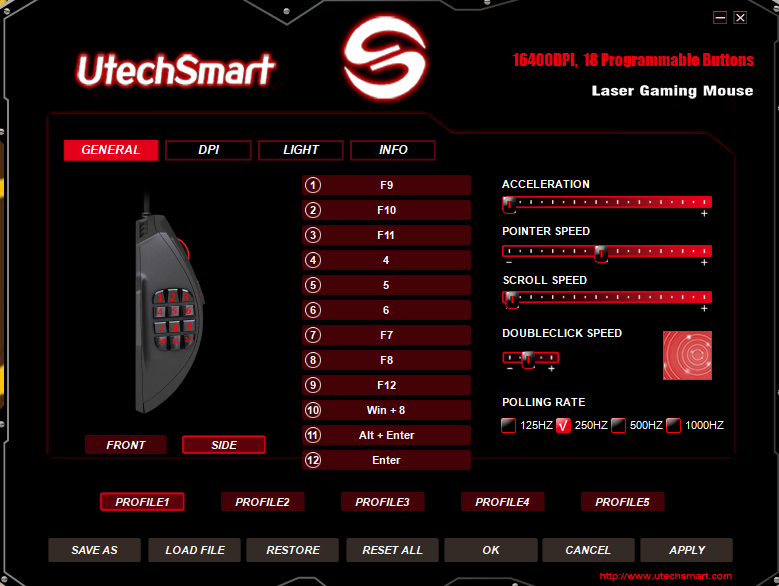 My settings do the following (I don’t currently use buttons 4-6, and 10-12 are all OCR functions): 1. Underline text [F9 in Verbatim] 2. Box text (emphasis) [F10 in Verbatim] 3. Highlight text [F11 in Verbatim] 7. Tag formatting [F7 in Verbatim] 8. Cite formatting [F8 in Verbatim] 9. Clear formatting [F12 in Verbatim] 10. Opens the 8th quick access link on my task bar, which is my OCR software [win + 8] 11. Is alt+enter, which is the shortcut in my OCR software for starting OCR area selection 12. Is just enter, which initiates OCR after area selection (and is also useful for creating line breaks) If you’d like, you can download my mouse settings here (installing those for the Venus is as simple as clicking “load file”). You could use them as a starting point or keep them as is. 4. Chrome add-ins I use the following add-ins on Chrome (to find and install add-ins, hover over "More tools" then "extensions." Click the menu (three bars) button in the top left, then "Open Chrome Web Store" in the bottom left). FreshStart. FreshStart is a tab manager program. It allows you to save tabs (individually or by window) and assign them a label, so you can close them and restore them later. It also has an excellent crash recovery function, one which has saved me unbelievable anguish over the years. The Great Suspender. The Great Suspender puts tabs that haven’t been recently active into “suspension.” It functionally closes the tab, but you just click on the page to reload it. This saves massive processing power for me, because I frequently have an absurd number of tabs open. When the tabs are suspended, among other things, ads aren’t playing. That alone is going to speed up your computer significantly. You can adjust how long a tab is inactive before it is suspended, and you can “whitelist” web addresses and/or domains so they are never suspended (especially useful for when using databases). Quick Javascript Switcher. Click a button, disable java on the website you’re on. That gets rid of most ads, which can make it easier to read and process an article. It also seems like the vast majority of websites “you’ve run out of free articles this month” messages are just java images that cover-up the text of the articles, but I of course encourage you to comply with terms and conditions etc. Cite Creator. Lawrence Zhou just turned me on to this. Cite Creator looks at meta data for a page and attempts to use it to construct a citation (it works best on major news sites, and not well for databases and PDFs). You can customize it to use whatever formatting you like. For example, the string to produce a rough outline of a UW cite is: %author%, %y% -- %quals%[%author%, "%title%," %publication%, %date%, %url%, accessed %accessed%]. You need to insert the line break yourself. Cite Creator often gets something(s) wrong, so if you plan to use it as a 1:1 cite shortcut, you should just not install it. But if you just use it as a jumpstart on creating the cite, that seems reasonable. Sidenote: my number one cite creation tip, which can be used in conjunction with Cite Creator, is construct the cite in the address bar of the website you’re cutting. That way you can create the cite without alt-tabbing to get information from the website. Just copy/paste directly into the address bar. Bonus: the address bar is like Notepad, it’s automatically de-formatted. Whatever you copy from the address bar will have no formatting. 5. “Forward All” in Gmail This one is simple, but a game-changer. Forward email chains all at once instead of one email at a time by clicking the vertical “…” and then “Forward all.”  (Also note in this image an example of gmail’s subject search, a very useful function) 6. Search Everything This is a program name, not a command. Everything is a free and powerful search utility tool. Did you cut the perfect file to answer an argument two years ago and you’re not sure where it is? Search for it with Everything. You can find Everything here 7. Turbotop This is a simple little (free) program that allows you to keep a window at the top of your screen, even if another program is active. It’s not specifically useful for debate, but I find it to be quite handy from time to time. You can download it here. 8. Use Spell Check as a functional macro to insert blocks/cards You may have noticed that while most of the time Spell Check in MS Word just puts a squiggly red line under words it believes are misspelled, it also occasionally makes auto-corrections. For example, type “yuo” and Word will automatically change it to “you”, instantly and without asking you. Word actually has a catalogue of words and phrases that it will autocorrect for you, a catalogue which you can edit. Here’s the gimmick: you can create a misspelling that will automatically correct to an entire block. For example, you can tell Word that “condogood” should be autocorrected to your entire condo good block. You can program Word that “econ!” should be autocorrected to your econ impact card of choice. To do this, start by highlighting the block/card/text that you want your shortcut to go to. If you don’t start by highlighting the desired text, you will not be able to insert formatted text. Then click “File” on the ribbon, then "options." From the Word Options menu, click "Proofing," then under the AutoCorrect Options header, click "AutoCorrect Options." Under "replace", type the shortcut you want to use (ex: "econ!"). The "with" field should already be populated with the text that you selected. 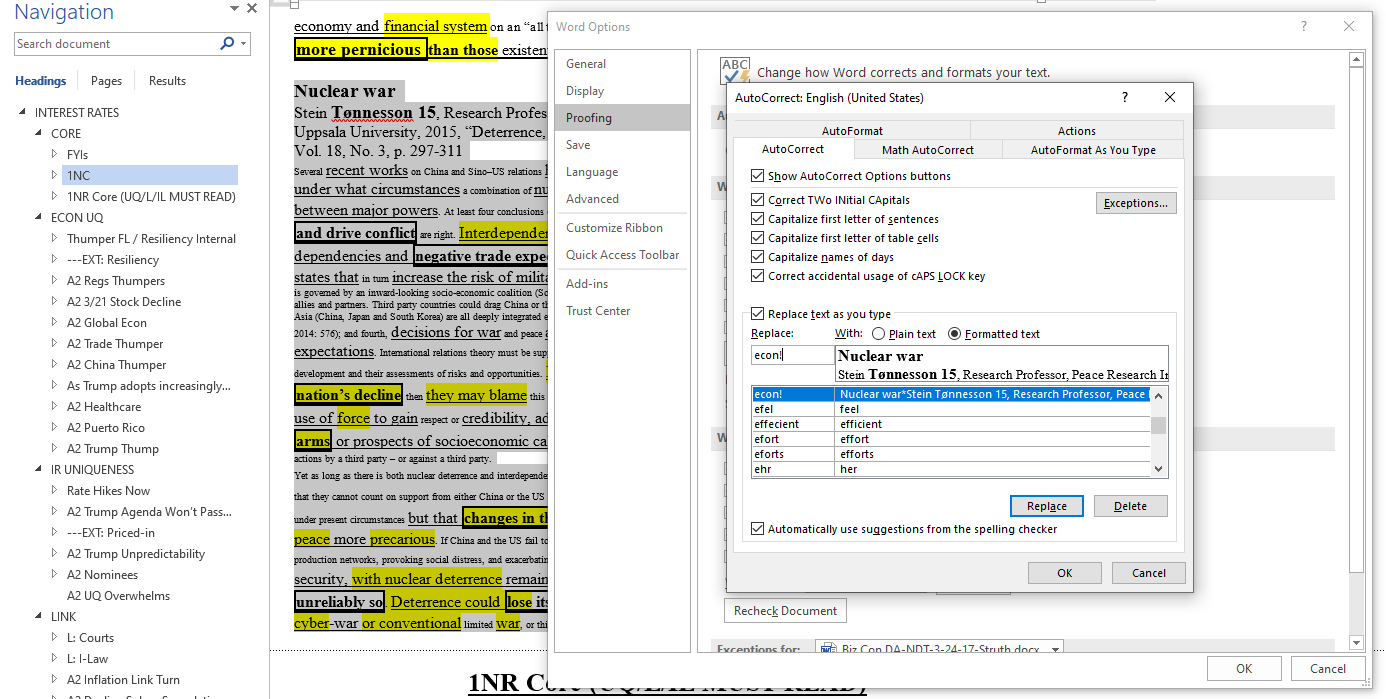 You can customize this to your heart’s content. If you ever actually meant to type “condogood” or “econ!”, you can simply press control+z to get back your original text instead of the autocorrect. 9. Use “Replace” to analyze your “Words per Speech” and construct perfectly-sized speeches You can use the replace function to quickly delete any text that isn’t highlighted. Why is this useful? Because it tells you approximately how many words you can read during a speech. Once you know that, you can use the same trick to make sure a 1AC/1NC you’ve put together won’t be too long (or too short). Pull up a typical 1NC and read through it. Delete everything after where you are when the timer goes off. Make sure you have nothing highlighted. Now in the doc map, click the arrow next to the magnifying glass in the search box. Click "replace." In the bottom left, make sure "More >>" is clicked. If it is, it will say "<< Less" in the middle of the menu. Now, under "Find what", delete any text and click the "Format" pull-down button (bottom left) then "highlight". Click "format" and "highlight" again, a second time. Your search will now identify that it's looking for not highlighted text. Leave the "Find what" field blank to look for all not-highlighted text, and replace it with a single space. Now hit "replace all." 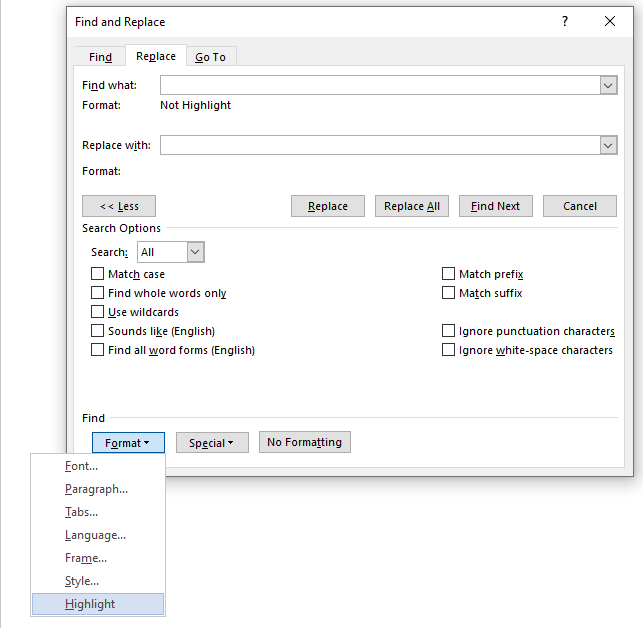 You should be left with a block of highlighted text. In the bottom left corner of the screen, Word will tell you how many words are in the document. That’s how many words you can read in a constructive. You can repeat that trick to measure if a 1NC is too long, too short, or just right.
10. Get several good timers The GOAT timer was made by Radioshack and is now permanently out of stock. However, the CDN TM30 is a pretty solid replacement. It's $16 on Amazon (and available through Prime Now in many cities for your emergency at-a-tournament replacement needs). You want a timer that has numeric buttons (not just minute / second) so you can manually input prep time (rather than clicking the second button 42 times, which is guaranteed to annoy your judge). There is a magnet on the clip, I always pop those out so it won’t mess with my other electronics. Why several? Timers break, you lose them, your partner will ask to borrow one (and you should *both* be timing *everything*), the judge might ask to borrow one, etc. I’m sure this list isn’t exhaustive. I also didn’t broach the subject of online debate; you can find our tech tips for online debate here. We want to hear from you! Disagree with something we said? Have any good tech tips we left out? Have a question? Feel free to jump in in the comments, we'll be sure to respond! Do you have a topic you’d like us to address in a future post? Email us at [email protected] Go Pokes!
2 Comments
DebaterX
6/6/2020 03:54:09 pm
It is actually pretty easy to get ahold of ABBYY Finereader. Your comment will be posted after it is approved.
Leave a Reply. |
MissionWyoming Debate Roundup is dedicated to providing quality debate content to Wyoming and Rocky Mountain area high school debaters. We’re a resource for Wyoming debaters by Wyoming debate coaches. Categories
All
Archives
February 2024
|
 RSS Feed
